General Instruction Guide
This instruction manual should be used in conjunction with TentandTable.com Operations Manual. Specific rules that apply to the unit are detailed in this manual. Always read the "Safety Rules" label attached to the inflatable game prior to operation. This label will specify any instructions relevant to the game to ensure safe operation.
General Information
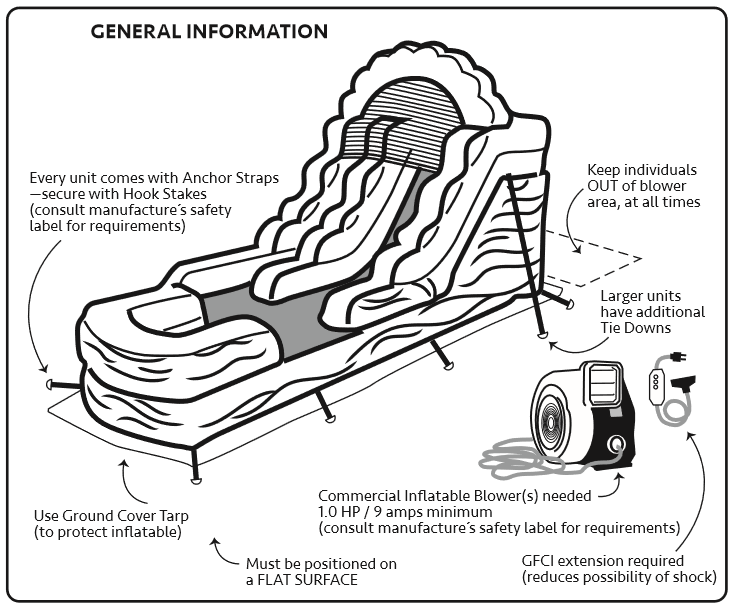
- Every unit comes with Anchor Straps. Secure them with Hook Stakes (consult your manufacturer's safety label for requirements).
- Use Ground Cover Tarp (to protect the inflatable).
- You must position the inflatable on a flat surface.
- Keep individuals out of the blower area, located behind the inflatable where fans connect, at all times.
- A GFCI extension (pictured) is required (reduces the possibility of shock).
- Also pictured is a commercial inflatable blower (required, 1HP/9amps minimum). Consult your manufacturer's safety label for requirements.
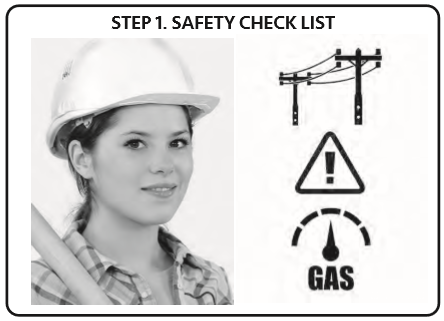
Safety Checklist
WARNING: Inflatable Games are very heavy - do not attempt to roll or move these games by yourself.
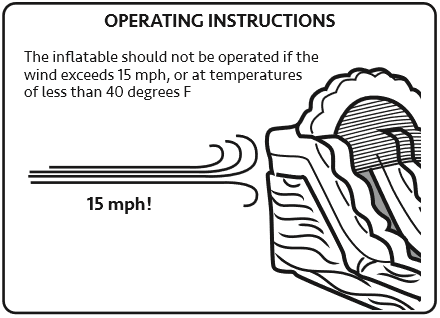
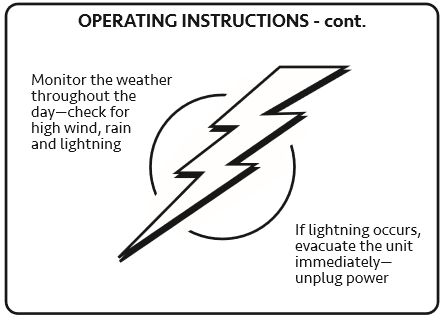
- Do not inflate in high winds or rain - High winds are considered to be 15 mph or higher.
- Inspect the site, look for overhead and underground obstructions - such as utilities.
- Call your local utility to have utility lines marked (call 3-5 days ahead) - call811.com is a good resource - "click" 811 in Your State.
- Use an adequate three wire extension cord, min. 12 gauge for 50ft. - never cut or remove the round grounding pin from the cord.
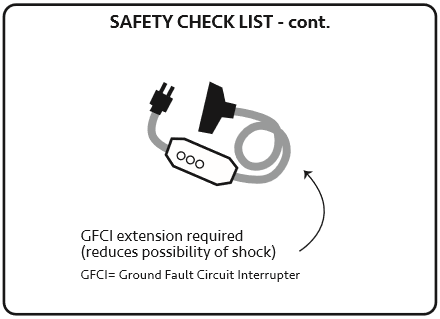
- GFCI stands for Ground Fault Circuit Interrupter.
- Always connect a GFCI extension cord adapter to any extension cord before plugging into a power source - this reduces the possibility of shock in wet environments.
- A GFCI extension cord adapter can be purchased at most Do-It-Yourself type stores.
- Check the GFCI operation at least once per event.
- Before staking unit into the ground, obtain marking and location information from the utility companies if there is a possibility of striking underground utilities.
- Remove all occupants if wind becomes excessive-deflate unit, if wind continues.
- Pick a location free from overhead electrical power or telephone lines - location should be free from trees, also,
- Any nearby obstruction should be at least 5 feet away from the inflatable.
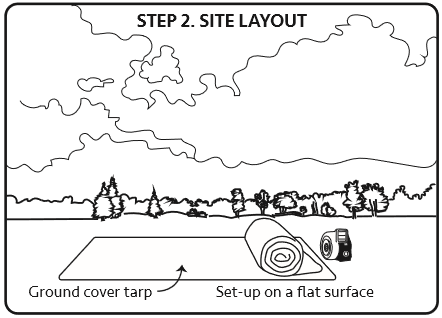
- Spread tarps (sold separately) on the slide/bounce house location, to protect unit - "tarps are cheaper than inflatables."
- Locate the blower in an area that is not in a direct pathway - be sure the blower is on a flat and dry surface.
Recommended Tools and Equipment: Sledge Hammer, Ground Tarp, Hand Truck or 4 Wheel Dolly, Safety Goggles, GFCI Extension Adapter, 50' or 100' 12AWG Extension Cord.
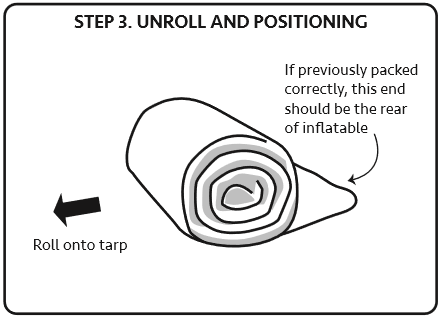
- If this unit was previously packed correctly, the end you begin rolling with should be the rear of the inflatable.
- Carefully place unit, using dolly, at one end of tarp - see (drawing) to find rear - it easier to move at this stage!
- (Make a mental note or snap a picture of how the inflatable is folded and positioned as you unroll the game. This will be beneficial when you re-roll the game later).
- Check location, make any adjustments before inflation - unfold unit completely.
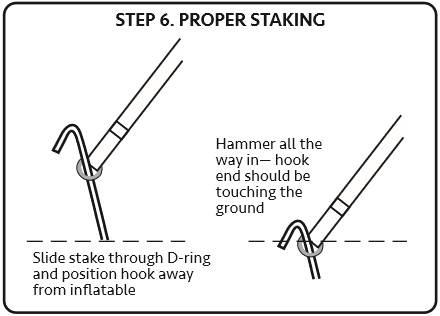
- Stake the inflatable (half-way) before inflating - anchor straps should be fully extended, away from unit
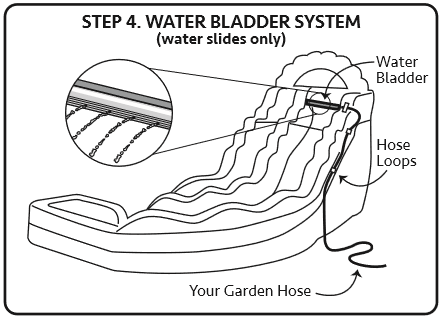
- This step only applies to water slide units. Your garden hose is routed through hose hoops and into a water bladder.
- Just before inflation, connect the bladder system.
- Most water slides have water bladder systems built into the unit - it keeps the slide wet.
- Start by taking your garden hose through the hose loops (side of inflatable) - begin at lowest loop.
- Then, locate bladder opening and attach hose.
- After the unit is fully inflated and you're ready for use, turn on water supply - leave it running for the duration.
Note: The landing will catch the water that runs from the slide - do not add water to the landing.
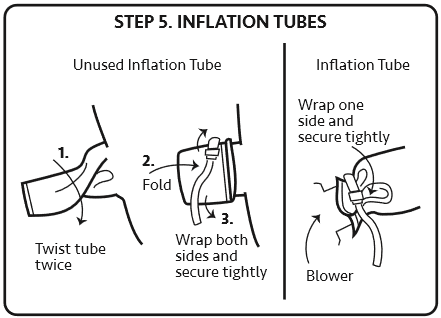
- Plug the blower power cord into the GFCI extension, then plug the GFCI extension into the extension cord - connect the fan cone to the inflation tube.
- Many games have two inflation tubes - both will used for large games.
- When only one is required, use the one that is most convenient.
- Close off the unused inflation tube.
- Plug the extension cord into the power source.
- Check the inflation tube to make sure it is properly attached to the blower fan - the inflation tube must be properly closed around the fan outlet cone to prevent large air leakage.
- Close all vents (if applicable).
- Locate the on/off switch (if applicable) on the fan and turn it on - observe the inflation of the inflatable as it rises.
- Do not place fingers or hands into the fan intake or outlet when the fan is operating.
- During the inflation of the unit check the positioning of the stakes - hammer them the rest of the way - see drawing.
- Once inflated, check for any rips, holes, or damaged seams.
- When properly inflated, all inflated areas of the game will become pressurized and firm.
Note: If you set up on concrete or indoors, secure with sand bags or water bags and additional tether straps.
Operating Instructions
The following instructions must be read and adhered to by every individual that will operate your inflatable game.
- The operator should make sure all buckles on the fans and tie-downs are attached properly and in good condition before operating.
- Operator should remove all debris from the inflatable prior to allowing persons to enter or climb on inflatable.
- Operator should only allow persons of the same age/size group in the inflatable at the same time.

- Follow manufactures recommend number of people on the unit at any one time, for the safety of the participants.
- Operator should make sure that no one enters the inflatable with shoes on, eyeglasses or sharp objects in their hair or clothing.
- Operator should observe persons at all times while they are in the inflatable.
- Operator should be close enough to be able to warn against flips, piling on, wrestling, bouncing against side, grabbing net or bouncing too close to each other - operator should ask anyone doing these things, after being warned, to leave the inflatable immediately.
- No running to enter the inflatable rides.
- The operator should point out and make customers aware of the posted warning sign on the front or side of the inflatable.
- Operator should watch for any signs of deflation such as sagging, wrinkling or distortion - if observed, the operator should ask the people in the inflatable to unload - the operator should keep them calm as there is no danger.
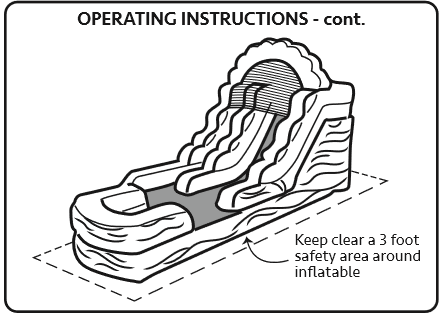
- Operator should keep all spectators outside the inflatable and at least 3 feet away from the sides.
- Starting line is 36 inches from the entry of the inflatable slides/rides.
- Check stakes regularly.
- Check GFCI at least once per event after initial setup.
- Check the blower/inflation tube regularly to ensure there isn't any excessive leakage.
- Keep airborne trash/leaves clear of blower intake.
- Prohibit excessive rough play by occupants.
- Keep clean and dry - if the inflatable gets wet, dry it that same day by blowing air through it.
- Do not allow any individual in the rear of the game or near the electric blower fan at any time.
- Do not allow people or riders on the inflatable if they consumed alcohol or illicit drugs.
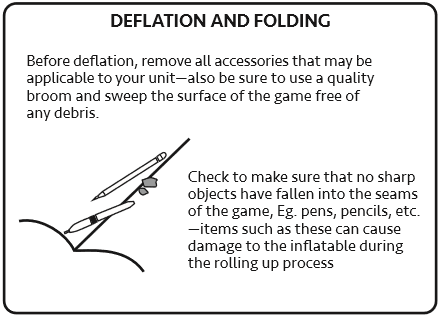
- Before deflating: Inspect for any damage and repair as necessary.
- Clean and dry - blow baking soda through game, if needed, to remove odor.
- Buckle any plastic snaps to reduce the possibility of entanglement in the netting.
- Unplug blower at the power source.
- Loosen first inflation/deflation tube strap and remove tube from blower cone - make sure tube is pulled away from the inflatable and is straight.
- Loosen second inflation/deflation tube strap and pull tube away from inflatable.
- Open all deflation flaps, on sides.
- While the inflatable is deflating, remove stakes, put blower fan away, and store extension cord(s).
Cleaning the Inflatable

- Do not use M.E.K.(Methyl Ethyl Ketone) to try and clean your inflatable, as this will damage the vinyl.
- Do not use a chlorine based cleaner or bleach, as this may damage the threads.
- Do not use any cleaning products containing alcohol to try and clean your inflatable, as this will damage any printing that may be on your inflatable.
- Use water and/or mild cleaner sparingly by sponging.
- Excessive water or cleaner may penetrate the seams and collect inside of the tube. Also, bubbling from the seams during operation may occur.

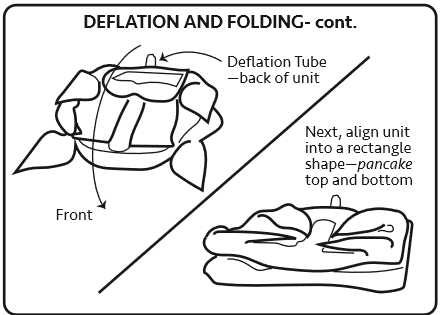
- Fold both sides into the center of unit - each person should place one foot on the game at the fold line.
- Fold at the same time - walk down the game and straighten out the seam.
- Repeat this procedure for the other half of the game.
- The roll; make sure that at least one of the inflation tubes is extending - as you roll the unit up, air will escape and the inflatable will roll much better.
Important: twist the begining of the "roll" very tight. - Start your roll from the FRONT (opposite the inflation tube).
- As you progress, be sure that the roll is straight and tight.
- Near the end, allow time for the last bit of air to escape.
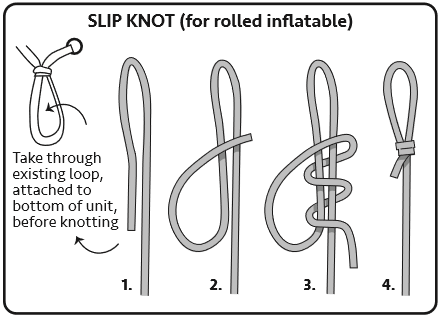
- Locate tie strap. Pull to top of roll.
- We recommend you tie a tight slip knot around the roll.
- Stand the game on end. Place the transport/storage bag over one end of the game and work it down as far as you can.
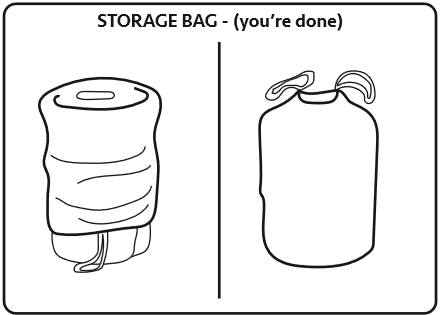
- It is important that you work the bottom of the bag down to the top of the roll - flip the unit and pull the bag up over the top of the inflatable.
- Tie the bag closed.
- Lay the game onto a dolly and roll it to your designated storage area.
Maintenance and Inspection
- The unit can be easily cleaned with a cloth or light brush. Use a vinyl cleaner and rinse lightly, to remove detergent before storing.
- Do not pack the unit when wet. If this is unavoidable lay the unit out to dry at the earliest opportunity.
- The unit should be inspected regularly for damage. If there is evidence of tearing at the anchor points or vinyl panels, the unit should not be used until the repair has been completed.
Repairs
- To repair small tears up to 12" use "Single Patch Method" as follows.
- Cut an oval or round vinyl patch approximately 4" larger than the cut.
- Clean the area around the tear.
- Apply SX-69 vinyl glue on the patch and on the surface of the in%uFB02atable.
- Allow the manufacturer's recommended drying time before applying the patch to the inflatable as indicated on the label on the container.
- Place the patch covering the cut area and apply pressure for 1 minute. Refer to the glue manufacturer's label for the recommended time for glue to dry once the patch is applied.
- If the "Single Patch Method" is not a viable option use PatchALL* for a non-glue repair until you can apply the "Single Patch Method" or send the unit to a repair facility.
Daily Checklist
- Ensure maximum winds are less than the manufacturer's recommended wind speed requirement for unit.
- Ensure temperatures are greater than 40° F.
- Ensure that a minimum 12 gauge 3 wire extension cord is used with the blower and is connected to a CFCI (Ground Fault Circuit Interrupter).
- Ensure there are no obstructions in the blower(s), blower intake and the unit's inflation tubes.
- Ensure unit is properly inflated.
- Ensure all tether points are secure. Check stakes.
- Ensure all deflation zippers and flaps are closed.
- Walk around the unit and inspect seams and search for wear damage.
© United Inflatable Rides. All rights reserved.
Powered by EventRentalSystems