| Property | Value |
|---|---|
| Model Number | 172 (Leaps & Bounds, aka The Big Baller) |
| Dimensions | 39' x 22' x 10' |
| Inflation Fan Requirements | Two (2) 1.5 HP Blower (reverse air louver assembly) |
| Minimum Anchor/Tether Points | Eight (8) |
| Maximum Weight Restriction | 275 lbs, each rider. 1,200 lbs, total. |
| Minimum Height Requirement | 44", or 3'8" |
| Maximum Height Requirement | 80", or 6'8" |
| Maximum Number of Participants | One (1) |
| Minimum Number of Trained Operators | One (1) |
| Total Weight of Unit | 643 lbs |
Operating Instructions
- Attendant(s) MUST be present and operating the inflatable unit at ALL times!
- The Leaps & Bounds may weigh over in excess of 600lbs. Caution should be exercised when moving/inflating/loading/unloading and handling the equipment. Use heavy-duty dolly with steel fenders such as Monster Mover to move your inflatable and staff should always wear back belts.
- Set up your Leaps & Bounds on a flat surface with an incline of no more than 15 degrees.
- Be certain the area that you will be setting your inflatable up is free of all debris including any rocks or sharp objects. Grass or hard ground is ok, Best to use heavy-duty ground tarp if used on cement or asphalt.
- Lay out a ground tarp to protect the inflatable.
- Footprint of inflated Big Baller is: 39'L x 22'w (including ramps).
- Required clearance from adjacent obstacles is five feet (5') around perimeter.
- Recommended required area for inflated Leaps & Bounds is: 50'x 32'x16'h (make certain there are no utility lines or ground obstacles such as protruding sprinklers or underground pipes that could be breached when driving in your ground stakes/anchors.
- Unroll the inflatable and attach (2) 1hp inflation blowers (producing minimum 650 cubic feet per minute - Reverse air louver assembly) to the inflation tube. Tie off any un-used air tubes and be sure that all zippers/ flaps are closed.
- Anchor/tether the inflatable prior to inflating. Using no less than (8) 18"x 5/8"dia stakes at 90° and 80% depth into firm ground, such as grass or dirt.
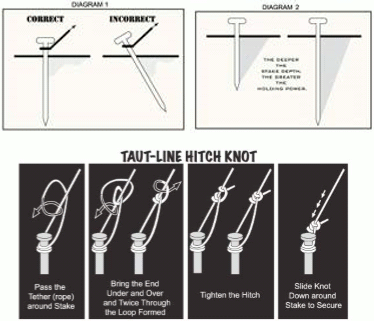
- If anchoring on a hard surface such as asphalt or cement, a minimum of 80lb sand or water bags should be required per anchor location.
- Connect two 1hp blowers to two of the air tubes using strap attached and close off the third air tube by twisting the tube several times and fold it over and secure snugly with attached strap.
- Make sure that all intake openings of the blowers are free from obstruction.
- You are now ready to inflate the unit.
- Plug your inflation blowers into the closest properly grounded (GFCI) 110v outlets only after you carefully read the blower manufacturer's safety instructions. Turn the switch to ON position and wait approx 5-7 minutes until inflatable is fully inflated and the equipment and all parts (4 balls) have been inflated and examined for potentially unsafe conditions prior to children or adults on the game. This unit requires continuous air pressure. Do not turn blowers off while patrons are on the inflatable.
- Leaps & Bounds should not be operated in wind speeds in excess of 15mph. Deflate inflatable immediately if wind gusts or rain develop.
- Do not secure the inflatable to a vehicle (or any object) that could be inadvertently moved while the game is in operation.
The trained operator(s) should now perform an inspection of the attraction. It is strongly recommended that any parts of the inflatable showing any signs of wear or distress (worn seams, tears in the vinyl, broken zippers, etc%u2026) be given special attention and immediately sent back to United Inflatable Rides, and then Inflatable 2000, for repair or replacement (at owner's expense).
Trained operator(s) should be present at all times. Under no circumstances should or any inflatable be left unattended! During operation of the game, a minimum of one (1) trained operator should stand in front of the inflatable watching the entrance / exit, as you can view the entire game from the front of the inflatable. The trained operator(s) should point out and make customers aware of the posted warning sign on the front or side of the inflatable. Operator Operator(s) should keep all spectators at least 3' away from attraction.
Rules of Safety
- No sharp objects.
- No glasses or other eyewear.
- No shoes.
- No food, chewing gum, or drinks.
- No jumping or flips.
- No climbing on the sidewalls.
- No fighting or rough play.
- No drugs or alcohol. Don't attempt this ride while under the influence of either.
- Do not participate if you have physical injuries or major medical conditions. These include but are not limited to:
- Broken or sprained bones. Even if you're in a cast.
- Current or previous injuries to the back or neck.
- Chronic joint conditions, such as the knee.
- Respiratory conditions such as asthma or bronchitis.
- Other major medical conditions, especially heart or lung conditions.
- Pregnancy.
Participants should be instructed to leave the unit in a calm and controlled manner if these situations occur:
- Deflation due to unit puncture/damage or power failure.
- Inclement weather (due to risk of thunderstorm and lightning).
The total deflation time on this unit is approximately five minutes. Should such an event occur, the trained operator(s) should advise the participants on an orderly exit and disallow new participants from entering the attraction until it is fully reinflated.
Inspection Procedure
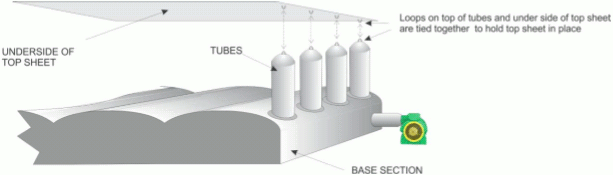
Inflatable 2000, Inc. has the exclusive rights to manufacture inflatable games and rides using the exclusive patented Zero Shock® technology.
For the first time ever, inflatable interactive games have transformed from a basic bounce house or slide to an interactive game with %u201Cmoving parts" that require special attention. Much like the shock absorbers in your car, the patented Zero Shock air bag system that is integrated into your game has similar shocks or tubes that offer a %u201Ccrumple" effect which absorbs the energy and impact in a similar fashion. These crumple tubes must be examined and inspected periodically and often. The way the Zero Shock system work effectively is by all of the crumple tubes working together in unison by being attached/secured to the top sheet of the air bag portion of the landing mattress. If even one (1) crumple tube is disconnected from the top sheet, the system can/will be unsafe and/or ineffective. Note: On the Leaps & Bounds aka The Big Baller, the most abuse or discord happens at the first ball where the patrons start the game. Most patrons first attempting the Leaps & Bounds will fall off near the perimeter of the first ball. This will be the most crucial portion of the game that you shall inspect the most thoroughly and most often. We recommend an inspection is completed before each use or rental.
The inspection procedure can be watched here, or you can use the 2D barcode:

- Lift up the top sheet by first untying the rope(s) that connect the top sheet to the floor or base of your inflatable mattress.
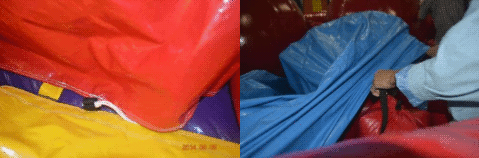
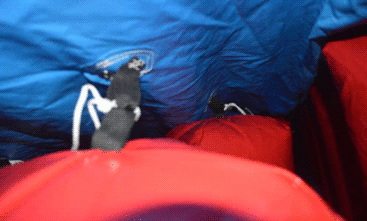
- Inspect all of the ropes that connect the crumple tubes to the top sheet. Crawl under top sheet if necessary to retie any ropes that may have come untied or broken. Use flashlight if necessary to look down the mattress bed to look for ropes that have become untied. This should be inspected from the right and left of the game as well as nearest and farthest wall to ensure the entire game has been thoroughly inspected. Also be sure to check around all of the 4 balls.
Exploded view of the anatomy your Zero Shock air bag mattress
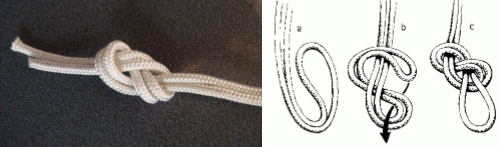
- It is also extremely important that the ropes are tied with a %u201Cfigure 8" knot. This is the best knot to ensure the crumple tubes do not come united. If you do not use a figure 8 knot, you risk the ropes coming united, thus making the game unsafe. Braided nylon rope is the best rope. If you need more for replacement or backup, you can order from Inflatable 2000 or we can let you know what model to purchase at your local hardware or supply store.
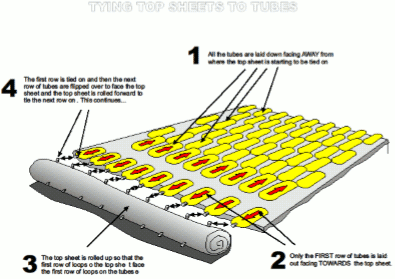
- In the case that you need to replace multiple ties/ropes on your game due to maintenance, cleaning or repair, you may opt to remove the entire top sheet and make repairs and/or replace ties/ropes that are not reachable. The diagram below shows the way in which this is done. We also have an instructional video that can be downloaded from our website.
Ready to Play?
The trained operator(s) will instruct the first participant to climb the stairs to the top platform. Once the participant is ready, the jump / hop to the first round ball hoping to not fall off. Once to the first ball, the participant proceeds to the next and so on until they reach the end and hop onto the exit platform and slide down and out of the inflatable. Once the first participant is to the end, send the second participant on to play. Watch crowd control.
Rolling Procedure
Step 1: Make sure there are no patrons on, inside or around the Inflatable 2000 unit prior to turning off the switch and unplugging the blowers.
Step 2: Before packing up any inflatable game, you should remove all accessories that may be applicable to game. Also be sure to use a quality broom and sweep the surface of the game free of any debris. Check to make sure that no sharp objects have fallen into the seams of the game, i.e. pens, pencils, etc%u2026 Items such as these can cause minor / major damage to the game during the rolling process.'
Step 3: Unplug the blower. As the game begins to deflate, go around and open all of the deflation flaps that may be located on sides or back of game. Allow the game to deflate to its natural state. Walls may have a tendency to fall outward. Depending on the inflatable, it could take from 5-15 minutes to deflate completely.
Step 4: Folding the game%u2026 You will need a second person or more to help fold the game. At this point, you will want to fold the game in thirds. Each helper will grab a corner and at the count of 3, you will both fold the game over. You may not get a perfect fold, so walk the game (shoes off) and try to line up so that both ends match. Repeat the same procedure for the other side. To help the air out of the inflatable, be sure that the blower tubes are facing out and walk the inflatable towards to blower tube to walk the air out if possible. Depending on the game, the game should be approx 3'-4' wide X whatever length applies.
Step 5: Rolling your inflatable%u2026 As noted above, you want to roll the inflatable so that the inflation tubes are extended out making it easy to walk the air out of the inflatable so the inflatable becomes pretty flat making for an easy roll. Roll your inflatable from the front to the back of game. 2 people should roll the game tight much like a sleeping bag. If you have a third persons help, have the third person walk inside of the roll, again helping the air escape and smash down any bumps of vinyl to ease in the rolling process. Be sure that your roll is straight on both sides and tight. As you come towards the end of the roll. Take the game strap and place it as far under the rolled inflatable as you can reach so that when the game is completely rolled, one helper can grab the end, another can grab the other end. Game straps may have an %u201CAlligator" mouth or a Dring to bring through to tie the game strap to the inflatable.
Step 6: With both persons helping, stand game on end. Place the storage bag over one end of the game and work down as far as you can to cover the entire inflatable. Rotate the game 180 degrees and pull the bag up over the top of the game. Tie the bag closed. Lay the game onto a four wheel dolly and roll it backwards to the storage area.
Notes
If there are any signs of wear on your inflatable game such as seam wear, zipper damage, top sheet damage, damage to the large balls, ripped webbing on crumple tubes or top sheet, please contact United Inflatable Rides, who will send the inflatable in for immediate repair.
Your inflatable is made of a PVC coated vinyl, is Flame Resistant and meets or exceeds National Fire Protection Association (NFPA) test method 1 and test method 2. The Flame Resistant material used will not be removed by washing.
Your inflatable is Flame Retardant and Phthalates free.
Your inflatable can be washed (while inflated) with water and a mild cleaner/ degreaser. Allow unit to dry completely before packing up so mildew / mold doesn't occur. Harsh cleaners or bleach should not be used.
If you have any questions or further assistance, you may call Inflatable 2000, Inc. at (626) 969-7780 / For emergencies, call (626) 926-5127 . Manufactured by Inflatable 2000, Inc. 207 N. Aspan unit 6, Azusa, CA 91702 USA.
© United Inflatable Rides. All rights reserved.
Powered by EventRentalSystems