EZ Inflatables Manufacturer Manual
This is a general manual that covers all inflatables. Please do not operate your inatable prior to thoroughly reading and understanding this owner’s manual. Even if you consider yourself a pro, we recommend that you take 60 minutes of your time to check this manual for new information that you may not already know.
Upon arrival of your equipment, you should check to make sure you have recieved the following items. If any item is missing, please inform us immediately.
- Inflatable rental (made of flame-retardent material; tested for compliance with NFPA 701 Largest Scale Test).
- Spikes (for keeping it tethered to the ground)
- Inflation fan
- Safety instructions printed on the rental.
- Accessory box (if applicable)
- Business card holder sewn into the unit.
- Heavy Duty Tarp (ground cover sheet).
Each unit includes:
- Entrance ramp.
- 2 or more blower tubes (units require blowers to sustain proper functionality).
- Anchoring stakes.
- Patches for reinforcement.
- Vinyl cement glue.
- Heavy duty tarp (ground cover sheet).
- Business card holder (sewn onto unit).
- Tie-Down Straps.
- Inflation fan.
- Anchors and tethers.
Operation Requirements
| Patron Age Limits | 4 years - 90 years |
|---|---|
| Patron Height Limits | 36" - 78" |
| Patron Weight Limits | 40lbs - 250lbs each |
| Maximum participants | 8** |
| Number of trained operators | 2* |
| Number of Stakes | 4 - 16 |
| Minimum Stake Length | 18" stakes, 100% buried. |
| Weight Container Anchors | 4 - 16 100lb (each) sand bags. |
*This number can vary depending on unit and size.
**Attention: For slides and obstacle courses, only 1-2 patrons allowed at one time.
Warning
Inflatables are heavy. When lifting any type of heavy weight, bend your knees and lift with the power of your legs. Do not bend over at the hips and lift with your back. If you are unsure you can safely move it around, get assistance and do it together.
Do not operate your unit while it is cold (less than 40 degrees fahrenheit), raining, or otherwise in wet conditions. If it gets windy, make sure the wind does not exceed 15 miles per hour.
Choosing an appropriate spot
Site Layout
- Pick a location free from overhead electrical power or telephone lines. Location should be free from trees that could damage or stain the inflatable. An unobstructed area should be maintained for five feet around and above the perimeter of the inflatable.
- Contact all utility companies and have all underground utility lines property located so no accidental contact occurs when driving stakes.
- Ensure there are no underground irrigation pipes or other utilities that the property owner has installed.
- Make sure the location selected is leveled and has no slope.
- Keep the front of the inflatable clear and accessible at all times. Make sure area is clear of any debris and that you have at least five feet of clearance around the perimeter of the inflatable.
Inflatable Bouncer Set-Up
Tools & Equipment
- Sledge Hammer
- Ground Cover Sheet (tarp)
- Hand Truck (dolly)
- 50' or 100' of 12 gauge extension cord.
- Spikes.
Site Layout
Make sure the area is clear of any debris and that you have five feet of clearance around (and above) the perimeter of the inflatable.
Inspection Checklist
- Make sure that the blower(s) is/are attached properly and securely to inflatable device.
- Check all deflation zippers are closed and secured.
- Check air blower electric attachment to be sure it has been properly plugged in to receptacle.
- Make sure air blower is not obstructed restricting intake on side of blower.
- Check inflation of the unit to make sure it is properly inflated to correct firmness.
- Make adjustment to slide and climb covers if necessary to properly secure position.
- Make sure all tether points are attached properly.
- Crawl through the unit, check all visible seams for wear and tear.
- Check netted area and sun covers to be sure they are in place and in good condition.
- Supervision by a trained adult attendant is required at all times.
Safety Operating Instructions
- Children's safety depends on the presence of an operator. Always the inflatable unit supervised by an operator who has received and understands the safety rules.
- Do not set up near swimming pools.
- Keep an age and size of riders comparable. Extra caution is needed for children ages three and under.
- Never allow older kids to bounce with children three years of age or younger.
- No one should be permitted to ride the unit if weight exceeds the indicated amount.
- Individuals with head, neck, back, and other muscular/skeletal injuries or disabilities, pregnant women, small infants, and others who may be suceptible to injury from falls, bumps, or bouncing are not permitted on or in unit at any time.
- Number of riders should be limited to the number specified on the label located on the back of the unit near the air tube.
- Absolutely no pets are allowed on or by the unit at any time.
- Do not allow climbing on the unit or netting equipment by anyone inside or outside of the inflatable unit.
- Do not allow anyone to jump on the inflatable near the door of the unit.
- No flips, wrestling, or extreme horseplay is allowed while on the ride.
- Do not allow riders to bounce closer than four feet from each other.
- Keep riders from putting netting in their mouths.
- No food, drinks, gum, candy, confetti, or trash in or around the unit.
- Unit must be anchored prior to and during operation.
- Persons not following the safety rules should be asked to leave.
- Do notSpray water on the ride for any reason.
- If wind becomes excessive (15MPH or more), unload occupants and deflate the ride.
- Do not allow anyone to put fingers, hands, or any objects into the fan intake, motor, motor housing, or outlet when running.
- Check the blower/inflation tube regularly to ensure there is not any excessive leakage.
- Check GFCI at least once per event after the initial set up.
- Only one person may slide per sliding area.
- Do not slide head first.
- Do not jump or dive in the slide.
- Only one person per lane on obstacle courses and slides.
- The landing area of a slide must be clear before the next person begins to slide down.
- Operator should be present at the climbing area to help climbers or remove those who are not capable of climbing.
Set Up Procedures
- Place your ground cover sheet over the site where you want the inflatable to stand.
- The next step depends on two scenarios:
- If your game consists of 2 units which are set up in a line, place and adjust the two units so that they open up against each other.
- If your game consists of 3 or more pieces which line up side by side, place and adjust the units next to each other such as the visual in the appendix.
- Locate the blower tubes on each unit. At least one of the tubes per unit must be attached to the motor blower; any extra tubes should be closed off. Pleat and fold the vinyl fabric as tight as you can. Then use the attached strap to secure it shut. This does not have to be airtight. Escaping air is what makes your unit bouncy. Some larger units might require 2 or more motor blowers. Refer to the spec sheet to check detailed requirements from number of blowers. Check around the unit for any deflation zippers and make sure they are closed and secured by their flap.
- Plug the fan power cord into the extension. Make sure the extension cord is away from foot traffic. Slide the blower opening into the tube. Then pleat and fold the extra fabric in the strap, especially around the bottom. Tighten the strap using the self-locking clip which is attached to the strap.
- Plug the extension cord into the power source. Locate the on/off switch on the fan and turn it on. Make sure the extension cord is away from foot traffic. Observe the inflation of the inflatable as it rises.
- If your game is a multi-piece unit, after it has been inflated move the pieces so that the velcro attachments line up to each other, then deflate the units. Once units are deflated, connect the velcro attachment points. If the units are placed next to each other, correctly, one side should have two flaps with velcro on the innersides of the flaps, while the corresponding unit has one secure. Turn the motor blowers on and re-inflate the units.
- Locate all of the tie down straps on the bottom of the unit. There should be at least one tied down strap on each corner and in some cases, one in between corners. Extend the strap and drive the provided stakes through the ring at the end of the strap. Locate all upper tethers and use the provided straps to extend them to the ground. Stake these tethers down at a 90 degree angle. Note: Always use the provided 18" stakes. Do not replace these stakes with different stakes. Contact us if you lose the stakes. Sand or water bags can be used instead of stakes, check the appendix for information about the number of bags to use. Before driving stakes, make sure they are not in the vicinity of utilities of irrigation.
- Before letting anyone on, please do a quick inspection of the unit. When properly inflated, all inflated areas of the unit will be pressurized and feel firm. Make sure the extension cord is away from any foot traffic. Check the inflation tube to make sure it is properly attached to the blower fan. The inflation tube must be properly closed around the fan outlet cone to prevent large air leakage.
- Do not place fingers or hands into the intake or outlet, especially when the fan is operating. Do not allow any children or adults in the rear of the ride or near the electric blower fan at any time.
- Make sure the operator understands all of the rules and safety procedures.
Visual Aids for Instructions
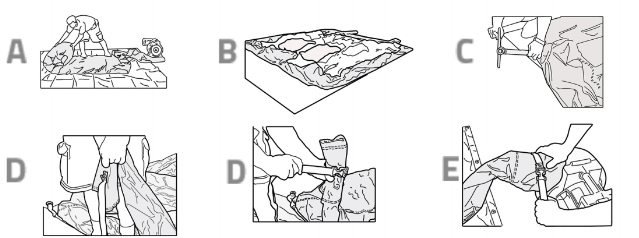
- Place and line up the unit. Unroll the blower tubes and the unit.
- Unfold the sides and straighten them out.
- Stake the inflatable, pointed perpendicular to the ground.
- Close the opening of one of the blower tubes.
- Plug in the fan power cord and slide the blower opening into the tube.
Wind Speed
| Beaufort Number | Wind Speed (mph) | Seaman's Term | Visual | Effects on Land |
|---|---|---|---|---|
| 0 | Under 1 | Calm |  |
None or near-imperceptible wind. Smoke rises vertically. |
| 1 | 1-3 | Light Air |  |
Smoke drift shows wind direction, but vanes/pinwheels/flags don't move. |
| 2 | 4-7 | Light Breeze |  |
Wind is felt on the face. Leaves rustle. Vanes move. |
| 3 | 8-12 | Gentle Breeze |  |
Leaves, small twigs in constant motion; light flags extended. |
| 4 | 13-18 | Moderate Breeze |  |
Dust, leaves, loose paper rile up, small branches move. |
| 5 | 19-24 | Fresh Breeze |  |
Small trees begin to sway. |
| 6 | 25-31 | Strong Breeze |  |
Large branches of trees are in motion; whistling heard in wires. |
| 7 | 32-38 | Moderate Gale |  |
Whole trees in motion; resistance felt in walking against the wind. |
| 8 | 39-46 | Fresh Gale |  |
Twigs and small branches begin to break off of trees. |
| 9 | 47-54 | Strong Gale |  |
Slight structural damage occurs; slate broken from roofs. |
| 10 | 55-63 | Whole Gale |  |
Seldom experienced on land; trees broken, structural damage. |
| 11 | 64-72 | Storm |  |
Very rarely experienced on land; widespread damage. |
| 12 | 73+ | Hurricane Force |  |
Violence and destruction. |
Use the Beaufort Scale to determine the wind speed while the device is inflated. If the wind speed exceeds the maximum allowable wind speed, deflate the infaltable.
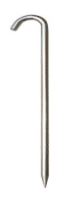
- Hook tether around the top of the stage, twisting the stake as you hook.
- Drive stake into the ground at a 90 degree angle, with the head of the stake facing away from the unit.
- Use 18" anchoring stakes for all bottom tethers.
Deflation & Packing Instructions
Before Deflating
- Before breaking down any game, inspect the game for any damages and repair as necessary. Remove all accessories that may be applicable to the game. This may include items such as harnesses, backing plates, bungee cords, etc. Be sure to use a quality broo and sweep the surface of the game free from any debris. Check to make sure that no sharp objects have fallen into the seams of the game (pens, rocks, etc). Make sure the game is dry. If not, dry the game.
- Buckle any plastic snaps to reduce the possibility of entanglement in the mesh.
Note: If the unit has steps attached to it, we highly recommend removing the steps and rolling them separately. This is to ensure the life span and quality of the steps.
Deflating
- Turn off and unplug the blower fan. As the game begins to deflate, go around and unhook the strap that secures the blower tube to the blower. Unhook the strap on the other blower tube to allow air to escape. If the unit has zippers, locate them and open the Velcro strap and secure it to the Velcro above to keep the strap in the open position. Unzip the zipper to speed up the deflation process (see illustrations below).
- Pull out the stakes around the unit and pack them up. If the game is a multi-unit piece, unhook the velcro attachments and proceed with the following steps for each individual piece.
- Walk from front to back of the unit to move any remaining air towards the blower tubes.
Folding
- Fold the base of the unit all the way around and walk around the unit to remove any air.
- Now make two half-folds to the middle. Walk around to remove any air.
- Fold in the half-folds and again walk around, removing any remaining air.
Rolling
- Prior to rolling the game, make sure that there is no excessive air and the fold is firm. You are now ready to roll! Start your roll from the front of the unit and roll it up like a sleeping bag. Keep pushing and flattening the roll as you go. You may also want to have someone walk on the roll in front of you.
- At the end of the roll, the blower tubes must be on the outside. Slide the straps under the unit, and then run the end of the straps through the rings on the other end of the straps, through the rings on the other end of the straps, and finally, pull tight. Loop the end of the strap around and tight a tight slipknot.
Standing the Game
- Place the storage bag overthe end of the game and work it down as far as you can. It is important that you work the bottom of the bag down to the top of the roll. Rotate the game 190 degrees and pull the bag over the top of the game. Tie the bag closed. Use a two-wheel dolly to transport the blower and accessories back to the same area. Now you are ready to pack up and leave.
Visual Aid for Instructions
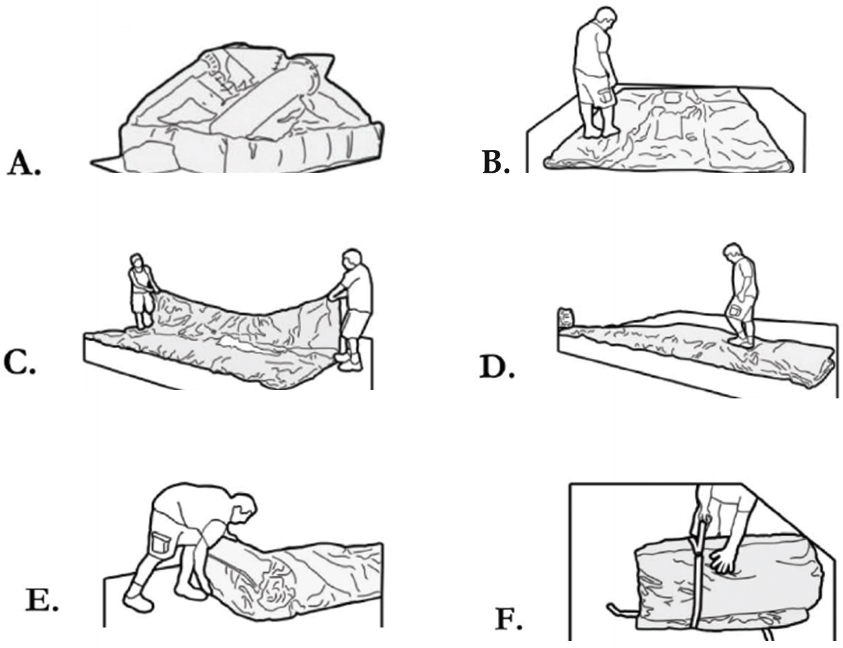
- Unplug the blower fan, unhook straps on the other blower tube.
- Fold in the base of the unit, walk on it, front to back, to push air out.
- Make two folds to the middle of the unit and walk around it (push air out).
- Fold the half-folds, walk again.
- Start rolling from the front of the unit.
- Slide the straps, tie with a tight slipknot.
Using Your Inflatable Ride
Every participant must be made aware of the inflatable safety rules. You should make sure that they read the warning label that's printed on the unit.
Behavior directions, capacity, and weight limits should be strictly followed for everyone's safety. It is the attendant's duty to supervise the unit and its participants and to enforce the rules at all times.
When strictly following these directions as outlined in this manual, you will use your inflatable unit the way it was intended to; you will keep participants safe, and your ride will stay in top condition longer.
- Enter/exit the unit one participant at a time.
- Use the inflatable while following the safety guidelines.
Caution: Operators must take control. Use a while, and do not leave the unit unattended during its operation for any resaon!
Safety Guidelines
Complications
Weather: In case of rain and/or lightning, have children exit the unit. Turn off the blower. Fold the unit and cover it with a tarp as soon as possible to help keep it dry. When the rain stops, use towels to dry the inside of the unit. You can now resume play!
Power failure: If the blower stops, riders must immediately stop jumping and calmly exit the unit. Hold open the exit flap (if applicable) and guide the riders out. Overloading an electrical circuit is the most common cause of the blower stopping; reset the fuse panel and make sure the blower has a dedicated circuit.
Additional Signage & Safety Guidelines
Operators must make customers aware of the following information before allowing them to participate on any inflatble.
We recommend having a sign made that can be placed in front of the unit, and large enough to read from a minimum distance of 50 inches.
We want you to have the most fun possible while helping us maintain the highest level of safety for you and your operators. You should not participate if you have any of the following conditions:
- Current or previous injury to the back and/or neck.
- Any respiratory conditiions (asthma, bronchitis, etc).
- Pregnancy.
- Chronic knee or other joint conditions.
- Any heart or circulatory conditions.
Remember, these units do require a certain amount of physical exertion, and you must judge for yourself your ability to participate. If you decide to participate, we suggest you follow these dos and don'ts for your own personal safety:
- If an attendant is not present, do not enter!
- Follow the attendant's instructions closely. They are there for your safety!
- Remove all loose and dangling jewelry, clothing, bracelets, watches, earrings, etc.
- Remove shoes.
- Do not do flips, wrestling, or extreme horseplay while on the ride.
- Do not bounce closer than four feet from each other.
- Do not bounce on the steps or near the doorway.
- No sharp objects are allowed inside or near the inflatable unit.
- No climbing or hanging on the outside walls or roof.
- No one is allowed on the ride while it is in the process of being inflated or deflated.
- No silly string or glitter is allowed near or in the unit.
- Do not tape or apply anything onto the ride.
- Stay off of the netting at all times.
If you have any questions, or are unsure of your ability to participate, ask the game attendant for assistance.
© United Inflatable Rides. All rights reserved.
Powered by EventRentalSystems